my latest wire wrapped design.

my latest wire wrapped design.

Sunday 23 September 2012

Did Ya Miss Me????

Well, I have been on holiday, and now I am home. We had a fantastic week, visiting Weymouth sea front, the Sea life centre and Monkey world, the kids behaved really well, and i got some fantastic photos. here are a few......

the Rays

 this was a funky shark.

 sea horse!!!!!!

 seals, they were great.

Just a few from the Sea Life centre, and now Monkey World....

 Dinda the Orangutan

 Lazy Lemur

 Little tiny baby Woolly Monkey


This is my family, minus me, outside Monkey world. My Mum, Brother, Sister and 4 Children. it was a most excellent day out!!!!!!

Only one make so far since i got home,


Black Dragon Vein Agate and Black Onyx with copper wire.

Friday 7 September 2012

Not mine but still excellent!!!!

Yesterday i went to work. There was a meeting in the hall and they let us go and have a look at what they had been doing all year. It was the AGM of the Cheltenham Miniaturist Club, they make dolls houses and they are fantastic!!!!!


Jubilee Garden Party.


Its so cool, i love it, and thought i had to share it with you all.


I thought they were brilliant, something a little bit different and really wanted you all to see this. The website for these wonderful people is www.cheltenhamminiaturistclub.com

So, I am off on holiday next week, going to sunny Dorset, so wont be posting. I will try to post again before I go. I do have more pictures of my own makes, but they will come when i get chance. 

TTFN x

Friday 31 August 2012

Better Late than Never.......

So, I haven't posted on here for months, what a time its been. In between looking after the kids and the zoo, I have been improving my jewellery skills, learning to make animals out of polymer clay, getting ready to go on holiday (2 weeks time), and most recently I have started learning to make pieces out of resin. Thats fun, but i do lack the patience to wait for it to cure, so have had a few EPIC FAIL'S!!!!


This is one of my successful resin pieces, and the first Christmas make of this year. (yes i know, its 4 months away but I am doing a home made Christmas this year and have lots to do. There will be flavoured sugars, coconut ice, cakes, resin pieces, clay designs and of course lots of gorgeous gemstones!!!!

I have also been designing lots of Bridal jewellery, and recently did a stand at a bridal fayre in birmingham:

This is of course my wonderful Mummy, and my little Sister too behind my stall at the MacDonald Burlington Hotel in birmingham on August 19th. I took the picture.

Thought you might like a sneaky peek at my Clay animals:


Bears and Dragons, an interesting mix, I give you, but only the beginning of what I hope will be a long line in clay animals. watch this space.........

So, to Christmas- I promise I will update this blog more regularly now, so here's to seeing plenty more prettiness!!!!!

TTFN xx

Monday 2 January 2012

Happy New Year!!!

So here we are, Christmas and the New Year rush over and done with, no snow as yet, but we can live in hope! Its been a busy festive period, with lots of craft fairs, lots of makes, and tons of baking.  Here are a few of the latest piccies........
Here is a cake I made for a friend in november. my first paid baking commission which went down a treat.
This was my Tardis Christmas cake, we had a Dr Who themed christmas (for some bizarre reason) and this was my main contribution. it was a lot of hard work (mostly kneading the colour into the icing) but i think it turned out really well.
And here is my lovely Mummy, sitting by the Jewellery table we did at her work 2 weeks before christmas.
And finally, my gorgeous christmas tree!!!!

Monday 3 October 2011

warmest october on record???

i think so indeed. anyways, how are you all? i am doing well, loving the sunshine although it feels odd as am in the middle of a pre-christmas clearout. putting washing on the line, and basking in the sunshine feels very strange when you think that there are only 11 weeks to go. so, have been busy crafting, and have loads of new pretties made, my favourites will be shown here.
and here.
as you can probably see, i am favouring pearls at the moment, although i love love love those dyed turquoise flowers in the above set, they are really pretty.

so, back to work i guess, will update again in the next few days xx

Sunday 21 August 2011

Christmas Flower Decoration. tutorial.

hey guys, so here is my latest design, the christmas flower tree decoration.
below is a step by step tutorial of how to make it yourself.
you will need the following: one pair of round nosed pliers, one pair of needle nosed pliers, one pair of wire cutters. you will also need: a long length of tiger tail jewellery wire (approx 40cm) 16x 6mm beads, 8x 8mm beads and 8x 10mm beads. also one short length (approx 5cm) 0.8mm wire and one charm of your choice   (i have used a snowflake)
thread onto your tiger tail, one 6mm bead, one 8mm bead and one 10mm like the above picture.
add one more 8mm bead, and cross the ends through it, left to right and right to left.
pull tight as above, ensuring that your beads are roughly in the centre of the wire.
add one 6mm bead to the left wire, and one 8mm to the right wire.
add another 8mm bead and cross the wire through it, again left to right and right to left, and pull tight.
continue like this until you have 7 10mm beads on the outside. cross the wires through an 8mm again, then thread another 6mm bead onto the left wire, and the final 10mm bead on the right wire.
now is the tricky part. take the left wire with the 6mm bead (as above) and thread it up through the first 8mm bead like so:

and pull tight.
then taking the final 10mm bead, cross the wires through it, again left to right and right to left.
and pull tight. now you have a flower, but you are not finished yet.
add a 6mm bead onto what is now the right wire.
and thread it through the nearest 10mm bead on the right side.
then pull tight. repeat with another bead, and all the way around until you have one gap left, at the top of the pendant.
thread on the final bead, and cross the wires through it, left to right and right to left, then pull tight.
thread a crimp bead onto the longest wire. cross the shortest wire through the crimp bead then thread it through the top bead making sure it doesn't poke out of the other end. 
using your needle nosed pliers, squeeze the crimp bead flat, then trim off the long length of excess wire on the left.

your decoration should now look something like this:
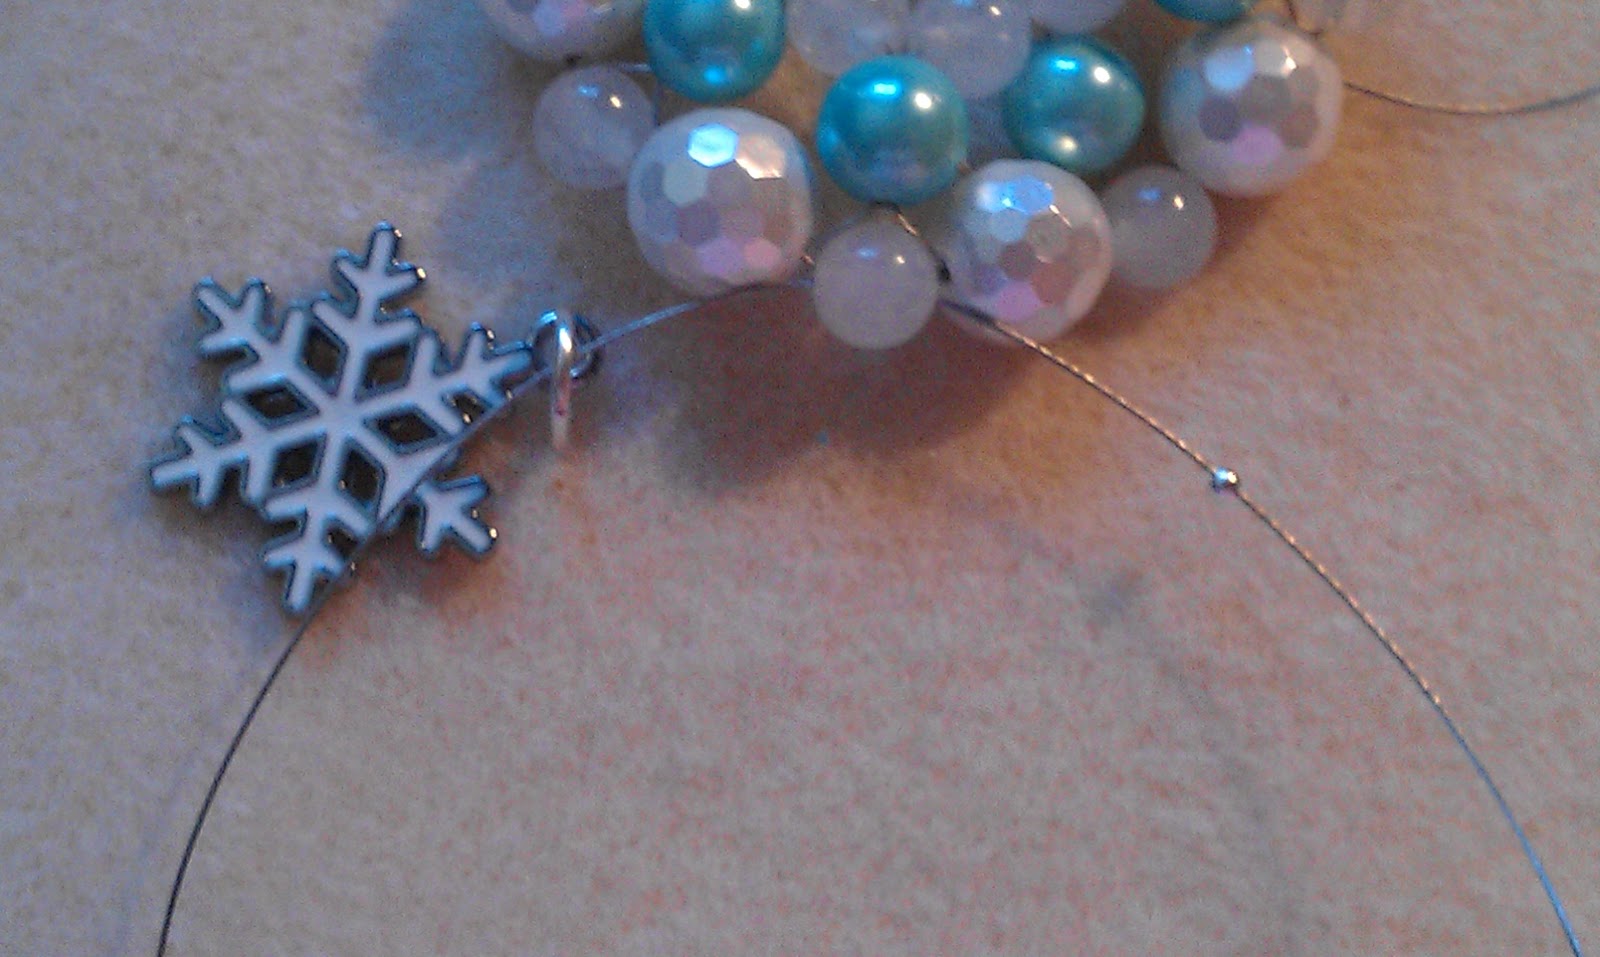
now you need to attach the charm to the decoration. to do this you need to use the short length of wire. using your round nosed pliers curl the thick wire into a ring like so:
then using your wire cutters, cut the ring where it would start to overlap. using your needle nosed and round nosed pliers, twist the ring apart a little, taking care not to pull the loop out of shape, then add the charm, and close the loop using the pliers.

now you can use the leftover length of tiger tail to attach the charm to your flower. thread the wire through the bottom bead of the flower making sure you have a roughly equal length of wire on both sides of the bead.

now thread on the charm by putting one side of the wire through your charm ring. thread a crimp bead onto the other side of the wire.
now cross the wires through the crimp bead and pull tight.
and use your needle nosed pliers to flatten the crimp bead. trim off the excess wire ends and..........
Voila!!! your decoration is complete. Well done.